
How to deploy Java applications using Docker
Transcript – How to deploy Java Applications Using Docker
Hi! In this tutorial we’re going to set up a simple Java application to build, deploy, and run inside a Docker container!
We’re going to set up the start to a continuous integration environment using Java, Maven and Docker. If you’re not familiar with Maven, there’s a Maven playlist of three videos to get you up to speed. Docker is getting very ubiquitous, but if you’re not familiar with Docker let me know in the comments and I’ll create more Docker tutorials.
Here’s our goal for this tutorial. We will compile the Java code, and on a successful build, we’ll package it up into a jar, and create a Docker container containing our Java application. We’ll do all of this within Maven. The Maven script can be called from any continuous integration tool.
From there we can push the docker file to a Docker repository, or we can use it to spin up as many instances of the machine that we want. That’s the power of Docker. We define our container once, and we can run it as many times as we want. This is important for microservices.
Create a Java Application Using Maven
Let’s start by creating a Hello World application using Maven. Enter this Maven archetype command into a command line on your computer. All the source and commands from this tutorial are listed on DeegeU.com so make sure you check that out.
mvn archetype:generate
    -DgroupId=com.deegeu.dockerapp
    -DartifactId=dockerapp
    -DarchetypeArtifactId=maven-archetype-quickstart
    -DinteractiveMode=false
At this point we have a simple Hello World application. If we compile and run it, it simply prints “Hello World”. This is the auto-generated Java application from the Maven quickstart archetype.
And this is what our generated POM file looks like. This project is a bare bones Java project, but we should be able to apply the next steps to any Java project.
<project xmlns="http://maven.apache.org/POM/4.0.0" xmlns:xsi="http://www.w3.org/2001/XMLSchema-instance" xsi:schemalocation="http://maven.apache.org/POM/4.0.0 http://maven.apache.org/maven-v4_0_0.xsd">
  <modelversion>4.0.0</modelversion>
  <groupid>com.deegeu.dockerapp</groupid>
  <artifactid>dockerapp</artifactid>
  <packaging>jar</packaging>
  <version>1.0-SNAPSHOT</version>
  <name>dockerapp</name>
  <url>http://maven.apache.org</url>
  <dependencies>
    <dependency>
      <groupid>junit</groupid>
      <artifactid>junit</artifactid>
      <version>3.8.1</version>
      <scope>test</scope>
    </dependency>
  </dependencies>
</project>
The next thing we want to do is add a plugins section to our POM file. This goes right under the dependencies section.
Add the Spotify Maven plugin to deploy Java applications using Docker
We’re going to add a plugin which helps us create Dockerfiles. There are several plugins to do this, but the one we will use in this tutorial is the one from Spotify. The most recent version of the Spotify Maven plugin is 0.4.10 [as of the video date], so we’ll use that one.
We want our Java application added to the Dockerfile after we’re finished compiling and testing. This happens in the package phase when we perform the build goal.
<plugin>
     <groupid>com.spotify</groupid>
     <artifactid>docker-maven-plugin</artifactid>
     <version>0.4.10</version>
     <executions>
         <execution>
             <phase>package</phase>
             <goals>
                 <goal>build</goal>
             </goals>
         </execution>
     </executions>
     <configuration>
         <imagename>deege/${project.artifactId}</imagename>
         <baseimage>java:8</baseimage>
         <maintainer>DJ Spiess ([email protected])</maintainer>
         <entrypoint>
             ["java", "-jar", "/opt/${project.build.finalName}.jar"]
         </entrypoint>

         <serverid>docker-hub</serverid>
         <registryurl>https://index.docker.io/v1/</registryurl>

          <resources>        <!-- Dockerfile building resources -->
              <resource>
                  <targetpath>/opt/</targetpath>
                  <directory>${project.build.directory}</directory>
                  <excludes>
                      <exclude>target/**/*</exclude>
                      <exclude>pom.xml</exclude>
                      <exclude>*.iml</exclude>
                  </excludes>
                  <include>${project.build.finalName}.jar</include>
              </resource>
          </resources>
     </configuration>
</plugin>
Every docker container starts with the user name and then the container name, separated with a slash like this. To make the code easier to change, I’m using the project name as the container name. We could also make it very generic and make a property for the user name if we want. For a company it might make sense to parameterize the user name.
We can also specify a private repository if we need to. To do this, we’d also need to specify a server and url.
The server credentials should be added to your Maven settings.xml file. The XML added looks similar to this, but you’d need to provide your own credentials. You’ll find the settings.xml file in the .m2 directory on your machine.
<servers>
  <server>
    <id>docker-hub</id>
    <username>foo</username>
    <password>secret-password</password>
    <configuration>
      <email>[email protected]</email>
    </configuration>
  </server>
</servers>
We’ll start our Docker image with the Java 8 base image. This is an official Java docker image. Well… as official as it gets. This is the OpenJDK version of Java running on Debian Linux. You can create a Docker image using Oracle’s JDK, but with licensing issues it gets tricky for someone to distribute one.
In a Dockerfile, we would create a line using the ENTRYPOINT command. We could also use the CMD command, but ENTRYPOINT makes sense when you’re creating a container where the application you specify should be the only thing runnable. That’s what we want in this case.
The reason for this is we want our Docker container to be immutable and created for a single purpose. That means there should be only one way to start our Docker instance.
Finally we want to specify where our jar should be installed in the Docker image. We’ll specify the target directory in the resources section of the plugin. We’ll put our jar in the /opt directory.
We also need to specify what to copy. So we need to specify the jar file, and the project directory where to find it.
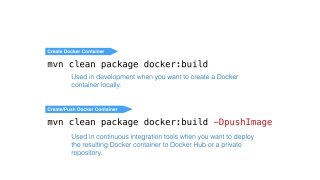
Maven commands to build and deploy Docker containers.
To build our Docker image, we can run the Maven command mvn clean package docker:build. This will build our application, and create a Dockerfile. When we want to push the image to a Docker repository, we’ll add the flag -DpushImage to our command. We’d do this in a CI build, but we probably would not include the flag for developer builds. So this is something you’d specify in your build tool, like Jenkins.
Once we’ve successfully built our Dockerfile, we can run it like any other container.
If we had more complex requirements for our Dockerfile, we can include a Dockerfile in our POM file. We would specify a directory containing our Dockerfile using the dockerDirectory element in the plugin. If we do this, baseImage, maintainer, cmd, and entryPoint elements are ignored.
Conclusion
That’s all there is to deploying Java applications using Docker. Once we’ve pushed the Docker image to a repository, we can use a script to pull the image and launch as many instances as we need.
If you have any questions, please let me know in the comments below or on DeegeU.com. If you want to be notified when new videos are out, you can subscribe to the DeegeU.com channel on YouTube, or you can subscribe to the DeegeU.com newsletter. The newsletter goes out once a month, and we won’t give your email address to anyone.
I’ll see you in the next video!
<!-- DeegeU - Right Side -->
<ins class="adsbygoogle" style="display:inline-block;width:336px;height:280px" data-ad-client="ca-pub-5305511207032009" data-ad-slot="5596823779"></ins>
<script>
(adsbygoogle = window.adsbygoogle || []).push({});
</script></p>
Tools Used
- Java
- Maven
- NetBeans
- Docker
Media Credits
All media created and owned by DJ Spiess unless listed below.
- Docker Logo – Owned by Docker
- Java Duke Logo – Owned by Oracle
- Apache Maven Logo – Owned by Apache Maven
- Kubernetes Logo – Owned by Google
- Open Shift Logo – Owned by Red Hat
- EC2 Logo – Owned by Amazon
Airport Lounge – Disco Ultralounge by Kevin MacLeod is licensed under a Creative Commons Attribution license (https://creativecommons.org/licenses/by/4.0/)
Source: http://incompetech.com/music/royalty-free/index.html?isrc=USUAN1100806
Artist: http://incompetech.com/
Get the code
The source code for “How to deploy Java applications using Docker” can be found on Github. If you have Git installed on your system, you can clone the repository by issuing the following command:
git clone https://github.com/deege/deegeu-maven-java-docker-example.git
Go to the Support > Getting the Code page for more help.
If you find any errors in the code, feel free to let me know or issue a pull request in Git.
Comments

DJ Spiess
Your personal instructor
My name is DJ Spiess and I'm a developer with a Masters degree in Computer Science working in Colorado, USA. I primarily work with Java server applications. I started programming as a kid in the 1980s, and I've programmed professionally since 1996. My main focus are REST APIs, large-scale data, and mobile development. The last six years I've worked on large National Science Foundation projects. You can read more about my development experience on my LinkedIn account.