
JUnit test case example in Java – CM004
DeegeU Java Course
The “Creating a Microservice Class Architecture” video is part of a larger playlist called “Creating a Java microservice from scratch“.
Transcript – JUnit test case example in Java
In this video we’re going to look at Java unit tests using JUnit. Testing code is extremely important, and even more so when we start automating our build process. Java unit tests are classes which test our application classes.
This is the fifth video in a larger playlist for creating microservices in Java.
What are JUnit tests?
When we build our code, our plan is to deploy it as quickly as possible. Of course we don’t want to deploy broken code, so we need a reasonable assurance that the code we’re deploying works. That’s where Java unit tests come in. Java unit tests are tests we write in Java to test our application, and are run after we compile our code. We’re using JUnit and Apache Maven to handle our Java unit tests. Specifically we’re going to use JUnit 4. They changed much about how we write unit tests between 3 and 4, so we need to make sure we’re using 4.
When we create our Java application using a Maven archetype, it adds JUnit 3 by default. The first thing we want to do is change the Maven coordinates in our POM file to make sure we’re using JUnit 4. There should already be coordinates added, so all we need to do is change the version to the current version. That’s 4.12, as of when this video was filmed.
Test phase in the Maven lifecycle
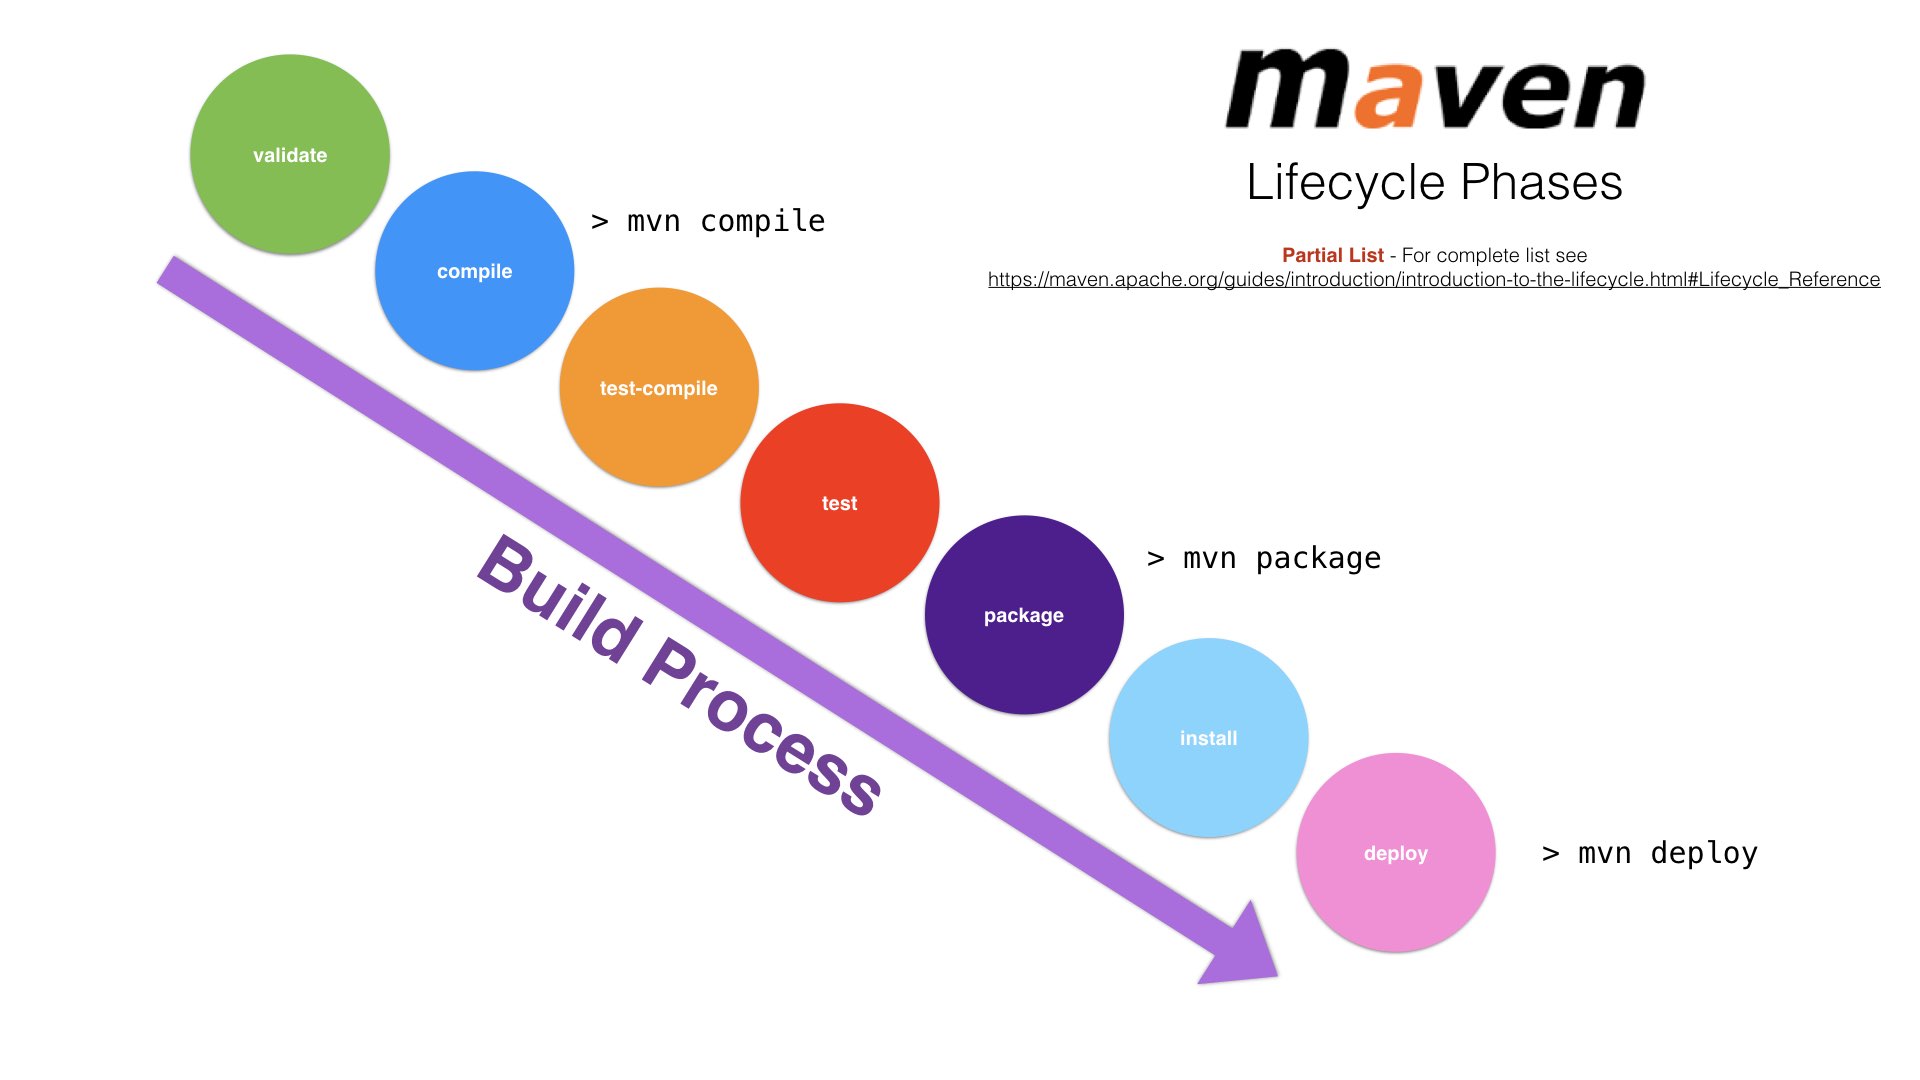
Maven Lifecycle
Adding JUnit tests to a Java project
There are two ways to add unit tests to our existing classes. One is to use the NetBeans IDE. If we right click on a class, then select Tools | Create/Update Tests, that will create a unit test for the selected class after we select the features we want in our unit test. This is often a quick way to generate tests for our classes.
The other way is to create the class manually. If we look in the source directory for our project, we’ll see a main directory and a test directory. The test directory is where our unit tests go. The package structure should match our source package structure. So if our class is in com.deegeu.trivia.model, that package structure should be matched in the test directory. Usually we name the class the same as the class we’re testing, but we suffix the name with the word test. So the TriviaApp class will have a test class called TriviaAppTest. That’s just convention, we could name it anything.
How to write JUnit test cases in Java
If we look at a test class, we’ll see the absolute minimum required for a unit test in Java. We import the necessary JUnit classes. And we have a test method. Every test method has the annotation @Test above the test method. Each method should test one thing. Every test method often has some call to Assert. Assert says “this thing is true”, and if it isn’t the test fails. Usually we match at least one method for every public method in class to test. That’s really the bare minimum. Every time we add a new feature or fix a defect, we should add at least one unit test for the change.
package com.deegeu.trivia;

import org.junit.*;
import static org.junit.Assert.*;

/**
 * Unit test for simple TriviaApp.
 */
public class TriviaAppTest {

    /**
     * Rigorous Test
     */
    @Test
    public void testApp() {
        assertTrue( true );
    }
}
Let’s start with the TriviaQuestionArrayAccess class. We’ll create a class called TriviaQuestionArrayAccessTest. We’ll start by testing each method.
public class TriviaQuestionArrayAccessTest {

    @Test
    public void testGetQuestion() {
        ...
    }

    @Test
    public void testGetRandomQuestion() {
        ...
    }

    @Test
    public void testGetQuestionList() {
        ...
    }

    @Test
    public void testGetQuestionListSize() {
        ...
    }
}
The pattern is usually we make the call, and we build an object that matches what we expect. If the two are equal, we pass the test. In this test, we get a list of questions. We check to make sure the list isn’t null, and then we check to make sure the size is 10. If those conditions are met, we assume the test passed. We could also add tests to make sure there are no duplicates, or any other case we want to ensure. A good practice is to add a test for every bug found in the system. So when you find a bug, add a unit test to check for the bug, then fix it. This way bugs are never reintroduced.
The tests for the TriviaQuestionBuilder are a little more interesting. We want to make sure our builder can’t build objects in an inconsistent state. What should happen in our builder is, if it can’t create the object, we should throw an IllegalArgumentException. If we try to build a bad TriviaBuilder, an IllegalArgumentException means the test was successful. In our @Test annotation, we specify the exception we expect. If you want to review the complete test source code, make sure you check out the source on GitHub.
@Test(expected = IllegalArgumentException.class)
public void testBuildIdFail() {
    (new TriviaQuestionBuilder())
        .id(-1)
        .build();
}

@Test(expected = IllegalArgumentException.class)
public void testBuildQuestionFail() {
    (new TriviaQuestionBuilder())
        .question(null)
        .build();
}
To test if our unit tests work, we run mvn test. This will compile the code, and then run our unit tests. We should see the results from our tests, and hopefully they are successful.
Let’s go back and change a test to intentionally fail. We’ll change the number of questions in our test to 100. In this case, the test will fail and Maven will report the build failed. That looks like this. Maven will even tell us which test fails, and why it fails.
Conclusion
It looks like everything is working as we expect.
And that’s how the unit tests work with JUnit. These tests will help us ensure our code is functioning as intended before we push it into production. JUnit 5 is in beta, and should be launched by the end of the 2016. I’ll create an update to JUnit tutorial sometime in 2017, but this code should work for version 4 and 5.
Thanks for watching the video. You can find the source code and the complete transcripts on DeegeU.com. Next we’ll take a look at storing our Trivia microservice code in Git. If you like what you’re seeing or have any questions, let me know in the comments or on DeegeU.com! See you in the next tutorial!
<!-- DeegeU - Right Side -->
<ins class="adsbygoogle" style="display:inline-block;width:336px;height:280px" data-ad-client="ca-pub-5305511207032009" data-ad-slot="5596823779"></ins>
<script>
(adsbygoogle = window.adsbygoogle || []).push({});
</script></p>
Tools Used
- Java
- NetBeans
Media Credits
All media created and owned by DJ Spiess unless listed below.
- No infringement intended
Get the code
The source code for “Are you ready to tackle the fizzbuzz test in Java?” can be found on Github. If you have Git installed on your system, you can clone the repository by issuing the following command:
git clone https://github.com/deege/deegeu-java-intro.gitGo to the Support > Getting the Code page for more help.
If you find any errors in the code, feel free to let me know or issue a pull request in Git.
Comments

DJ Spiess
Your personal instructor
My name is DJ Spiess and I'm a developer with a Masters degree in Computer Science working in Colorado, USA. I primarily work with Java server applications. I started programming as a kid in the 1980s, and I've programmed professionally since 1996. My main focus are REST APIs, large-scale data, and mobile development. The last six years I've worked on large National Science Foundation projects. You can read more about my development experience on my LinkedIn account.