
3 ways to add a datasource to WildFly 9
DeegeU Java Course
The “3 ways to add a datasource to WildFly” video is demonstrates three different methods for adding a datasource to WildFly 9. These all assume a fresh install, with a single user created. This video also assumes you have PostgreSQL installed and running, and a database created called “demo1”.
Transcript – 3 ways to add a datasource to WildFly
Hi, DJ Spiess here at DeegeU.com. If you’re writing a JEE application in Java, you’re going to need a datasource. There aren’t too many applications I can think without a database of some type. Configuring a datasource in WildFly is very easy. In fact there are several ways to do it. Each have their pros and cons, and that’s what we’ll look at in this video. 3 ways to add a datasource to WildFly coming up next!
So in this lesson, the goal is to go from a fresh install with a user created to a configured datasource in WildFly. We’ll look at adding it in the management console first. Then we’ll add a datasource to WildFly by modifying the standalone.xml file. We’ll do the same thing again, but add it from the command line interface. When we’re done, we’ll look at the benefits of each method. If you don’t have WildFly installed on your machine, you might want to look at the “4 steps to get you started with WildFly download lesson first. In this video, I’m using WildFly 9.0.1 Final.
Startup WildFly if you haven’t already. For this video, we’re going to use Postgres, but the steps work for any database. I’m also assuming your database is installed, up and running, and has a database created in it. I called mine demo1.
In all three methods you’re really doing the same two steps. The first step is to load the JDBC driver into WildFly. The second step is to configure your datasource.
You’ll need to have the JDBC driver somewhere on your machine. Just goto the website for your database, and find the driver for your database version. For this video I’m going to
https://jdbc.postgresql.org/download.html
Usually if you Google the name of your database and add the words “JDBC driver”, that will take you to the download page. You’ll also need the JDBC connection string for your database server. That looks something like this.
jdbc:postgresql://200.100.50.10:5432/demo1
OK, let’s dive in!
Add a datasource to WildFly from the management console
First lets do this from the UI. The first thing you need to do is open the console app in your browser. Here’s the address if you forgot how to get there.
http://127.0.0.1:9990/
If you’re connecting to a server that isn’t local, you’ll need change the URI to match your server. You’ll come to a page that looks like this. Click on “> Create a deployment”. To the left, you’ll have all the current deployments. We’re starting from a clean WildFly installation here, so mine is empty. Click “Add”. This brings up a wizard to walk through.
Select “Upload a new deployment”, then “Next”. Click “Choose File” and navigate to the location on your computer where you stored your JDBC driver. Once you’ve selected your JDBC driver, click “Next”.
On the final page, you can update the name if you like. I usually change it to be the database name and version. In this case, “Postgresql”. I’ll leave the runtime name as is. Basically the name is how the deployment is known to your users. It must be unique. The runtime name is how it’s known to the server. This way you can have multiple names, but they can point to the same runtime name. Or not. Depends on how you want your environment set up. Make sure you check “Enable” and then press finish. Your JDBC driver is now available.
Click back on “Home”. The next task is to create the datasource, so click on “> Datasources”. This will bring up another wizard. Select the datasource type. In this case, I’m selecting “PostgreSQL Datasource”. Click “Next”.
On the Datasource Attributes page, give the datasource a name and JNDI name. This is how your application is going to see your datasource. So the name and JNDI name must be unique. Make sure you keep the java:/ part in your JNDI name. Click “Next”.
When it asks you to select a driver, click the “Detected Driver” tab. That will give you a list of JDBC drivers installed in WildFly. You should see the driver you just installed. Click that one, and then click “Next”.
Update the connection URI to match your server. You’ll also want to update the username and password to match you credentials. Click “Test Connection”. If it fails, the error will have a “Details” button to tell you why it failed. Otherwise it will say success, and you have a added a datasource to WildFly.
Add a datasource to WildFly from the standalone.xml file
Behind the scenes the management console is updating the standalone.xml file. If you’re not familiar with WildFly, the standalone.xml is the configuration script for your server. It contains configuration for everything you want to run in your server.
Let’s manually do everything we did in the first segment of this video. So we need to add the JDBC driver first.
Navigate to the /modules/system/layers/base directory in your WildFly directory. Create subfolders /org/postgresql/main The subfolders need to match the package structure of your JDBC driver. So if you’re using an Oracle database, you’d want to create /com/oracle/main. Copy your JDBC driver into the directory you created.
Next you need to create a XML file in the directory called module.xml. The XML file looks like this:
 <!--?xml version="1.0" encoding="UTF-8"?-->
<module xmlns="urn:jboss:module:1.1" name="org.postgres">
  <resources>
    <resource-root path="postgresql-9.4-1201.jdbc4.jar">
  </resource-root></resources>
  <dependencies>
    <module name="javax.api"></module>
    <module name="javax.transaction.api"></module>
  </dependencies>
</module>
Make sure the resource-root element path matches the exact name of your JDBC driver.
Next we need to edit the standalone.xml file in the /wildfly-9.0.0.CR2/standalone directory. Look for the drivers element. It should be under the datasources element. We need to add the driver here with the following XML snippet.
<drivers>
    <driver name="postgresql" module="org.postgres">
        <xa-datasource-class>org.postgresql.Driver</xa-datasource-class>
    </driver>
</drivers>
This adds the driver to WildFly. Now we need to configure the datasource. Just above in the datasources element, add this XML snippet.
<datasource jndi-name="java:jboss/datasources/PostgresDS" pool-name="PostgresDS" enabled="true" use-java-context="true">
    <connection-url>jdbc:postgresql://192.168.99.100:32770/demo1</connection-url>
    <driver>postgresql</driver>
    <security>
        <user-name>postgres</user-name>
        <password>password</password>
    </security>
</datasource>
Restart WildFly, and you should be good to go. You can verify your connections in the management console.
Add a datasource to WildFly via the CLI
The final way to show you is to add your datasource via the command line interface. It’s often abbreviated as the CLI. The CLI can be a whole series of videos on it’s own, but basically the CLI is a special command line interface to communicate with the WildFly application server. It has two advantages. You can automate your interaction with the WildFly server through a script, and you can run this on a running WildFly server. Again the process is broken into two steps.
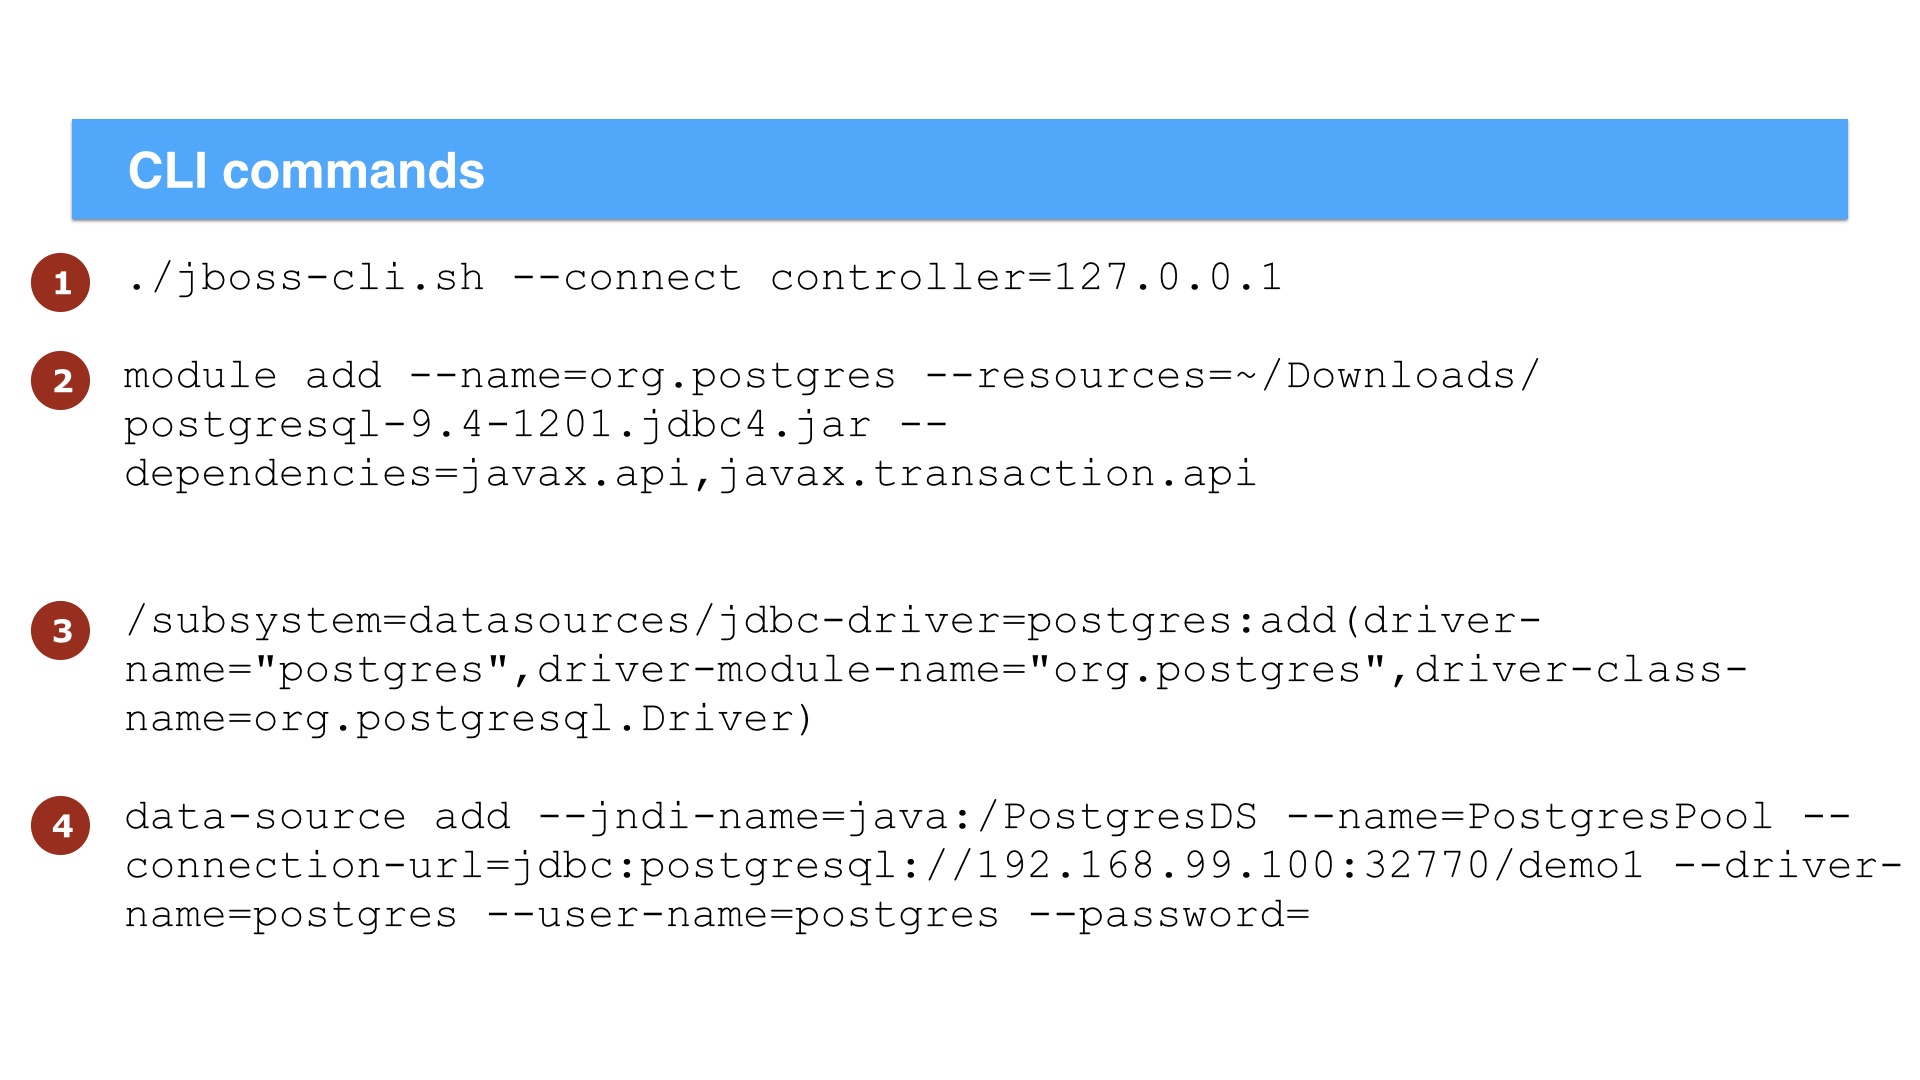
We first start the command line interface with the following command.
./jboss-cli.sh --connect controller=127.0.0.1
Then we install the JDBC jar. We do this by loading the jar by adding a module. This is the command to do that.
module add --name=org.postgres --resources=/tmp/postgresql-9.4-1201.jdbc4.jar --dependencies=javax.api,javax.transaction.api
Then we add the driver to the datasources subsystem. We do that with this command.
/subsystem=datasources/jdbc-driver=postgres:add(driver-name="postgres",driver-module-name="org.postgres",driver-class-name=org.postgresql.Driver)
Finally we create the datasource that uses the JDBC driver we just installed.
data-source add --jndi-name=java:/PostgresDS --name=PostgresPool --connection-url=jdbc:postgresql://192.168.99.100:32770/demo1 --driver-name=postgres --user-name=postgres --password=password
And that should be it! Again we can test it by going into the management console for WildFly. So how do these three methods compare?
Comparison of 3 ways to add a datasource to WildFly
Well the first method is the easiest. There’s no coding, and it just requires a few clicks. The downside is you need access to the management console. Depending on how dev-ops operates at your company, this might be a non-starter. You don’t really want people logging into your system to make changes. It’s a security issue.
The second method is good, because you can provide the XML as part of your deployment. If you have multiple applications running on the server, that might not be the best idea. Different groups might write over each other’s changes in the standalone.xml. So it creates a versioning issue for the operations team. The other problem is you must reboot the server to add the datasource.
The third option really is the best from a dev-ops perspective. You can provide a script that is run when you install your application. This script can be part of your standard deployment, and you can create a script that starts from a fresh installation. This plays well with technologies like Docker.
So that’s the three ways you can install a datasource in WildFly. You can add it through the WildFly management console, add it to the standalone.xml file, or you can add it through the CLI. You should now have a datasource you can use from your JEE applications! See you in the next video!
<!-- DeegeU - Right Side -->
<ins class="adsbygoogle" style="display:inline-block;width:336px;height:280px" data-ad-client="ca-pub-5305511207032009" data-ad-slot="5596823779"></ins>
<script>
(adsbygoogle = window.adsbygoogle || []).push({});
</script></p>
Tools Used
- Java 8
- NetBeans
- WildFly 9.0.1 Final
Media Credits
All media created and owned by DJ Spiess unless listed below.
- WildFly logo owned by Red Hat, Inc. (http://www.wildfly.org)
- PostgreSQL logo owned by the PostgreSQL Global Development Group (https://wiki.postgresql.org/wiki/Trademark_Policy)
Get the code
The source code for this video can be found on Github. If you have Git installed on your system, you can clone the repository by issuing the following command:
git clone https://github.com/deege/deegeu-wildfly-add-datasource.gitGo to the Support > Getting the Code page for more help.
If you find any errors in the code, feel free to let me know or issue a pull request in Git.
Comments

DJ Spiess
Your personal instructor
My name is DJ Spiess and I’m a developer with a Masters degree in Computer Science working in Colorado, USA. I primarily work with Java server applications. I started programming as a kid in the 1980s, and I’ve programmed professionally since 1996. My main focus are REST APIs, large-scale data, and mobile development. The last six years I’ve worked on large National Science Foundation projects. You can read more about my development experience on my LinkedIn account.
DeegeU Java Course
The “3 ways to add a datasource to WildFly” video is demonstrates three different methods for adding a datasource to WildFly 9. These all assume a fresh install, with a single user created. This video also assumes you have PostgreSQL installed and running, and a database created called “demo1”.
Transcript – 3 ways to add a datasource to WildFly
Hi, DJ Spiess here at DeegeU.com. If you’re writing a JEE application in Java, you’re going to need a datasource. There aren’t too many applications I can think without a database of some type. Configuring a datasource in WildFly is very easy. In fact there are several ways to do it. Each have their pros and cons, and that’s what we’ll look at in this video. 3 ways to add a datasource to WildFly coming up next!
So in this lesson, the goal is to go from a fresh install with a user created to a configured datasource in WildFly. We’ll look at adding it in the management console first. Then we’ll add a datasource to WildFly by modifying the standalone.xml file. We’ll do the same thing again, but add it from the command line interface. When we’re done, we’ll look at the benefits of each method. If you don’t have WildFly installed on your machine, you might want to look at the “4 steps to get you started with WildFly download lesson first. In this video, I’m using WildFly 9.0.1 Final.
Startup WildFly if you haven’t already. For this video, we’re going to use Postgres, but the steps work for any database. I’m also assuming your database is installed, up and running, and has a database created in it. I called mine demo1.
In all three methods you’re really doing the same two steps. The first step is to load the JDBC driver into WildFly. The second step is to configure your datasource.
You’ll need to have the JDBC driver somewhere on your machine. Just goto the website for your database, and find the driver for your database version. For this video I’m going to
https://jdbc.postgresql.org/download.htmlUsually if you Google the name of your database and add the words “JDBC driver”, that will take you to the download page. You’ll also need the JDBC connection string for your database server. That looks something like this.
jdbc:postgresql://200.100.50.10:5432/demo1OK, let’s dive in!
Add a datasource to WildFly from the management console
First lets do this from the UI. The first thing you need to do is open the console app in your browser. Here’s the address if you forgot how to get there.
http://127.0.0.1:9990/If you’re connecting to a server that isn’t local, you’ll need change the URI to match your server. You’ll come to a page that looks like this. Click on “> Create a deployment”. To the left, you’ll have all the current deployments. We’re starting from a clean WildFly installation here, so mine is empty. Click “Add”. This brings up a wizard to walk through.
Select “Upload a new deployment”, then “Next”. Click “Choose File” and navigate to the location on your computer where you stored your JDBC driver. Once you’ve selected your JDBC driver, click “Next”.
On the final page, you can update the name if you like. I usually change it to be the database name and version. In this case, “Postgresql”. I’ll leave the runtime name as is. Basically the name is how the deployment is known to your users. It must be unique. The runtime name is how it’s known to the server. This way you can have multiple names, but they can point to the same runtime name. Or not. Depends on how you want your environment set up. Make sure you check “Enable” and then press finish. Your JDBC driver is now available.
Click back on “Home”. The next task is to create the datasource, so click on “> Datasources”. This will bring up another wizard. Select the datasource type. In this case, I’m selecting “PostgreSQL Datasource”. Click “Next”.
On the Datasource Attributes page, give the datasource a name and JNDI name. This is how your application is going to see your datasource. So the name and JNDI name must be unique. Make sure you keep the java:/ part in your JNDI name. Click “Next”.
When it asks you to select a driver, click the “Detected Driver” tab. That will give you a list of JDBC drivers installed in WildFly. You should see the driver you just installed. Click that one, and then click “Next”.
Update the connection URI to match your server. You’ll also want to update the username and password to match you credentials. Click “Test Connection”. If it fails, the error will have a “Details” button to tell you why it failed. Otherwise it will say success, and you have a added a datasource to WildFly.
Add a datasource to WildFly from the standalone.xml file
Behind the scenes the management console is updating the standalone.xml file. If you’re not familiar with WildFly, the standalone.xml is the configuration script for your server. It contains configuration for everything you want to run in your server.
Let’s manually do everything we did in the first segment of this video. So we need to add the JDBC driver first.
Navigate to the /modules/system/layers/base directory in your WildFly directory. Create subfolders /org/postgresql/main The subfolders need to match the package structure of your JDBC driver. So if you’re using an Oracle database, you’d want to create /com/oracle/main. Copy your JDBC driver into the directory you created.
Next you need to create a XML file in the directory called module.xml. The XML file looks like this:
<!--?xml version="1.0" encoding="UTF-8"?--> <module xmlns="urn:jboss:module:1.1" name="org.postgres"> <resources> <resource-root path="postgresql-9.4-1201.jdbc4.jar"/> </resources> <dependencies> <module name="javax.api"/> <module name="javax.transaction.api"/> </dependencies> </module>Make sure the resource-root element path matches the exact name of your JDBC driver.
Next we need to edit the standalone.xml file in the /wildfly-9.0.0.CR2/standalone directory. Look for the drivers element. It should be under the datasources element. We need to add the driver here with the following XML snippet.
<drivers> <driver name="postgresql" module="org.postgres"> <xa-datasource-class>org.postgresql.Driver</xa-datasource-class> </driver> </drivers>This adds the driver to WildFly. Now we need to configure the datasource. Just above in the datasources element, add this XML snippet.
<datasource jndi-name="java:jboss/datasources/PostgresDS" pool-name="PostgresDS" enabled="true" use-java-context="true"> <connection-url>jdbc:postgresql://192.168.99.100:32770/demo1</connection-url> <driver>postgresql</driver> <security> <user-name>postgres</user-name> <password>password</password> </security> </datasource>Restart WildFly, and you should be good to go. You can verify your connections in the management console.
Add a datasource to WildFly via the CLI
The final way to show you is to add your datasource via the command line interface. It’s often abbreviated as the CLI. The CLI can be a whole series of videos on it’s own, but basically the CLI is a special command line interface to communicate with the WildFly application server. It has two advantages. You can automate your interaction with the WildFly server through a script, and you can run this on a running WildFly server. Again the process is broken into two steps.
We first start the command line interface with the following command.
./jboss-cli.sh --connect controller=127.0.0.1Then we install the JDBC jar. We do this by loading the jar by adding a module. This is the command to do that.
module add --name=org.postgres --resources=/tmp/postgresql-9.4-1201.jdbc4.jar --dependencies=javax.api,javax.transaction.apiThen we add the driver to the datasources subsystem. We do that with this command.
/subsystem=datasources/jdbc-driver=postgres:add(driver-name="postgres",driver-module-name="org.postgres",driver-class-name=org.postgresql.Driver)Finally we create the datasource that uses the JDBC driver we just installed.
data-source add --jndi-name=java:/PostgresDS --name=PostgresPool --connection-url=jdbc:postgresql://192.168.99.100:32770/demo1 --driver-name=postgres --user-name=postgres --password=passwordAnd that should be it! Again we can test it by going into the management console for WildFly. So how do these three methods compare?
Comparison of 3 ways to add a datasource to WildFly
Well the first method is the easiest. There’s no coding, and it just requires a few clicks. The downside is you need access to the management console. Depending on how dev-ops operates at your company, this might be a non-starter. You don’t really want people logging into your system to make changes. It’s a security issue.
The second method is good, because you can provide the XML as part of your deployment. If you have multiple applications running on the server, that might not be the best idea. Different groups might write over each other’s changes in the standalone.xml. So it creates a versioning issue for the operations team. The other problem is you must reboot the server to add the datasource.
The third option really is the best from a dev-ops perspective. You can provide a script that is run when you install your application. This script can be part of your standard deployment, and you can create a script that starts from a fresh installation. This plays well with technologies like Docker.
So that’s the three ways you can install a datasource in WildFly. You can add it through the WildFly management console, add it to the standalone.xml file, or you can add it through the CLI. You should now have a datasource you can use from your JEE applications! See you in the next video!
Final Notes
The source code for this video can be found on Github. If you have Git installed on your system, you can clone the repository by issuing the following command:
git clone https://github.com/deege/deegeu-wildfly-add-datasource.gitGo to the Support > Getting the Code page for more help.
If you find any errors in the code, feel free to let me know or issue a pull request in Git.
| Video Links | |
| Tools Used |
|
| Media Credits |
All images are owned by DJ Spiess unless listed below:
|