The Java switch tutorial – J018
DeegeU Java Course
The Java switch tutorial video is part of a larger free online class called “Free Java Course Online”. You can find more information about this class on “Free Java Course Online” syllabus.
Try at home
- Create a program that is a multiple choice quiz
- Try switching on different variable types: char, int, short, byte
- Experiment with adding and removing breaks for fall-through code
- Try creating errors in your program and compiling it
Transcript – The Java switch tutorial
Hi there everyone! My name is DJ Spiess, and in this lesson we’re going to look at another control statement. My childhood Green Lantern game I described in the last lesson was too basic. It offered two choices, the correct choice and the choice that kills him. If I had known more control statements at the time, I could have given our hero more choices to avoid his demise. Or more creative ways for him to horribly meet his end. In this lesson I’m going to share with you is about branching Java code based on a value using the switch statement. That’s coming up!
The goals for this lesson are to learn what is a switch statement. We’re going to look at why we need to include breaks for each cases. We’ll look at the default case. And finally I’ll show you when it’s a good idea to use a switch, and when a simple if-else statement will suffice.
What is a Java switch statement?
A switch statement is a control statement that allows you to select a code block to run based on a value. For example, you might have a variable that can have 4 possible values. In each case, you want a different Java block to run. An example might be in a game. You want different actions to happen when the user presses a button. Depending on the button, you might be moving up or firing your weapon.
The switch statement allows you to switch to different code blocks to execute. You list the possibilities, and Java will select the correct block at runtime.
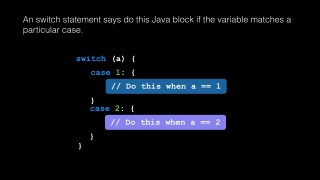
The switch statement looks like this. You have the keyword “switch” to start your switch block. Immediately following the keyword is a variable that determines which block of code to switch to. The variable can be a char, byte, short or int. Basically anything with clear discrete values. So floats and doubles are out. As you remember from the floating point lesson, we could never switch on 0.1.
A switch statement must account for every possible value. While booleans would fit this description, they are not allowed. You can also use a string, enumerated type, or primitive class types. Those are types we’ll cover in a later lesson. We list every case we want to handle as a case. Each case is defined with the keyword case, a colon, and then the Java block to run.
Why Fall-through?
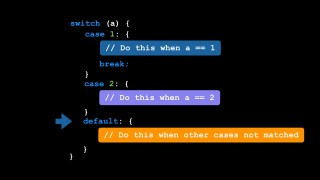
The switch statement has a weird concept called fall-through. When Java is finished executing your case block, it will fall-through and start executing the next Java block. It will keep doing this until it gets to the end of your switch, or it reaches the keyword break. The reason Java does this is because the C language does this. I’m not sure why C does this, and newer languages like Apple Swift don’t do it. If you know why C and Java have fall-throughs, please leave a comment below. I’d love to know.
What this means is you should add the keyword break to every case statement. If you don’t, you should leave a very large all-caps comment that says you’re allowing Java to fall through intentionally. Really. Other programmers will think it’s an error if a break is missing.
Default is the default
The last part of the switch, is optional, but you should always include it. That’s the default keyword. This is the case to run if all others fail. It should be the last case you list. The only time you could consider not using the default, is if you have listed every possible case for all time, and it was clear that it’s impossible to add another case. Even if the default case does nothing, however you should leave a comment explaining why it does nothing. That way it’s clear to another developer reading the code that you did consider the default case.
Ok, we’ve seen enough keywords and structure to test this out in code. Let’s create a switch statement in code and run it.
Multiple cases
There’s another thing you can do with switch statements. If you have multiple cases that perform the same action, you can do this. This allows you to test for small ranges. Each case still requires a colon.
If-else vs switch
Now you could get the same results in your code using a long if-else statement. Each case would be a new if-else. You’ll want to prefer a switch statement if you have more than a few possibilities. Usually I go with the number 4. If I have 4 or more cases, I’ll consider using a switch. Otherwise I’ll stick with an if-else.
Other things I do are always use breaks and default. You can probably come up with an argument for a specific case where it’s not needed, but I can come up with a bazillion cases where it is needed. You’re better off including them.
The real difference between the two is switch branches on the value of a variable. If-else statements branch on conditions. If you’re looking at branching your code based on a single variable value, then a switch might make more sense. If-else works better with testing general conditions since if-else doesn’t need to test a single variable. Switches on the other hand read better when you’re working with enumerated types. We’ll cover enums after we cover classes.
So that’s how the switch statement works in Java. You’ve seen the importance of using breaks in all cases, and why you should include a default case. We’ve also talked about when to use a switch, and when to use the if-else. Next we’ll take a look at looping in Java! Till then!
Tools Used
- Java
- NetBeans
Media Credits
All media created and owned by DJ Spiess unless listed below.
- No infringement intended
Get the code
The source code for “Are you ready to tackle the fizzbuzz test in Java?” can be found on Github. If you have Git installed on your system, you can clone the repository by issuing the following command:
git clone https://github.com/deege/deegeu-java-intro.git
Go to the Support > Getting the Code page for more help.
If you find any errors in the code, feel free to let me know or issue a pull request in Git.
Don’t miss another video!
New videos come out every week. Make sure you subscribe!
Comments

DJ Spiess
Your personal instructor
My name is DJ Spiess and I’m a developer with a Masters degree in Computer Science working in Colorado, USA. I primarily work with Java server applications. I started programming as a kid in the 1980s, and I’ve programmed professionally since 1996. My main focus are REST APIs, large-scale data, and mobile development. The last six years I’ve worked on large National Science Foundation projects. You can read more about my development experience on my LinkedIn account.

