The Java Packages Tutorial Video of Your Dreams – J026
DeegeU Java Course
“The Java Packages Tutorial Video of Your Dreams” video is part of a larger free online class called “Free Java Course Online”. You can find more information about this class on “Free Java Course Online” syllabus.
Try at home
- Create a package in your IDE
- Create a package in your filesystem
- Create a class in your package
- Try importing the java.math libraries statically
- Try creating errors in your program and compiling it
Transcript
Hello everyone! DJ Spiess here, and we need to take our namespaces and use them in our Java code. This video is all about Java packages, how they relate to namespaces, how to create Java packages, and how we use them in code. Admit it! You dreamed about this. Well it happening! Let’s get started!
In this lesson we’re going to look at how we structure Java applications physically in our computer using the Apache Maven best practices. We’ll look at translating class namespaces to Java packages, and finally I show you how to use Java packages in code.
The first thing I want to show you is how you should organize your Java code. You could put all your Java code files into one directory, but I think we can all agree that’s a bad idea.
The best practice for Java is to create a directory under your project directory called src. This structure is ok for simple projects, but for larger professional projects you need to use something like Maven. Maven is a build tool from Apache that helps you organize and build your code. IDEs like Eclipse and NetBeans support Maven. I won’t go into too much detail about Maven, there’s a few videos on the subject in the Maven playlist and I’ll likely create a new video section on Maven in the future. For now know that Maven forces you to organize your code according to best practices, and that’s how we’re organizing our code.
Java best practices for organizing your code
Here’s the simple version on how Maven expects you to organize your code. You create a project directory. That’s where your POM file goes. The POM file is an XML file to describe your project. Then there’s a directory called src/main/java/. Your Java files go there. It’s that easy. In fact, you’ll notice the directories in the source code for the lessons use this directory structure. Inside the src/main/java directory we organize our Java code using Java packages.
Mapping Java namespaces to Java packages
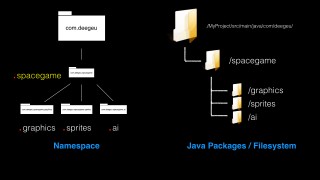
A Java package is a grouping of related Java class files providing access protection and namespace management. We’ll focus on the namespace management part for now. In the last lesson we saw how we use namespaces to organize our classes. Namespaces are the logical organization, and Java packages are the physical implementation of namespaces.
Since namespaces are hierarchical, we’d need a similar structure to store our class files into packages. File systems are also hierarchical. So to store our namespace organized classes, we simply map the namespace to our filesystem. Packages are that simple.
So to map the com.deegeu.animal.Duck class inside our src/main/java directory, we’d create the directories com, deegeu, and animal. The case matters, even if you’re on a Windows machine – so make sure they’re always lowercase. Inside the animal directory, we’d add our Duck class.
The Duck class also requires an edit. It needs a new declaration placed at the top of the Java file using the package keyword. The package keyword tells Java this class belongs to this namespace. If your file is located in a different package directory than the namespace you define in the statement, your Java code will not compile. So the package declaration and the physical file location must match.
If you store your file at the root source directory, in this case src/main/java, you’d need to omit the package declaration in your class file. When you omit the package declaration, your class is placed in a special namespace. It’s located in the default package. Basically that’s the “no-namespace” namespace. Best practice is to put every class you create into a defined namespace and Java package. The only time I’d consider not creating a namespace and package is for a toy program where you’re just testing something out. As a rule though, always create packages for your classes. So let’s create a package in the IDE.
If you have a project with no classes or packages, Netbeans will display a grayed out “default” package. That’s the package when there is no package. It’s a bad idea, so let’s create a package.
We’ll right click on Source Packages, and then select New | Java Package. Now you could create each level in your package heirarchy one level at a time, but that’s just busy work. We’ll type in the whole namespace for animals. So that would be com.deegeu.animals. Then click finish.
That will create all the directories required to match that package. So if we look at the directories, we’ll see all the folders created. Now we could also just create the folders manually. Let’s add trees as a package under com.deegeu. Then when we go back to our IDE, you’ll see that package listed as well.
If we want to create a class, we can right click on the package name and select New | Java Class. We’ll call it Duck and save. And if you look at the top of the file, the IDE will put in the correct namespace for this package. This works like this in Eclipse as well. You can also create the class manually in the directory you want, and as long as your add this package line, you’re good to go. I’ll let you try that at home. If you have questions, let me know in the comments.
When you want to use a class in your code, there are a few rules on how you import it. When two classes are in the same namespace, that means they are in the same directory and same Java package. They can reference and use each other without any additional steps. If they are not in the same directory, they’re not in the same package. They don’t share a namespace. When two classes do not share a package, you need to import the class to use it.
How to import classes in Java
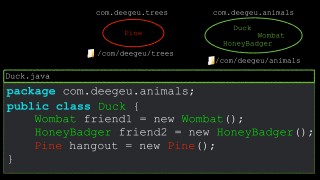
When you want to use a class from another package, you’ll need to use the fully qualified class name. You use it like this in your code. This is a good thing to remember, especially when you’re using two classes with the same name. The other way to use a class is to import it.
To import a class, you need to use the keyword “import” at the top of your class file after the package declaration. Following the import keyword, you import the class using the fully qualified class name. That’s the namespace followed by the classname.
If you want to import an entire package, you can use the wildcard namespace like this. So if we don’t want just the Duck class, we can import the entire animal package like this.
There’s debate on if this is a good practice. Personally I only want to see the classes that are imported, and I want to see what packages they are coming from. You can argue the java packages can be imported using a wildcard, since you should know the Java APIs.
For my code, I list out every single class. you can always roll up the import list like this.
The last way to import code is to statically import a method. Static imports import a a static variable or methods. Then in your code, you do not need to reference the enclosing class. It looks like this. The idea is it makes your code more succinct and readable.
I rarely use this method, and I reserve it for things like math or string functions and constants. You also see it used often in test code or assertions. We’ll cover that in another lesson. For now, lets look at imports in code.
We saw earlier that you can import a class using the import keyword. Let’s import a class using the fully qualified name. Let’s use the Arrays class to sort an array. So we’ll make a call to the static method sort by using the fully qualified name. That looks like this.
Usually though you’ll import the class using the import statement. So to do the same thing, that looks like this. We could import using the wildcard in the package name, but I rarely do that. It’s a good practice to list only the classes you’re using.
We could import this method statically. That means we’re importing only the static method sort. Then we can call it in our code with just the method name. I’d use this sparingly. The reason is, this looks like a method inside your class. It’s not immediately obvious this is a sort method in a different class.
You can also import everything statically. This is even worse, because you could be importing many methods, and it gets very confusing which belong to the class. I only use this for JUnit classes or assert classes. But you have it available to you if you need it.
Well we’ve seen how we structure Java applications, specifically to the Maven best practices. I showed you how to translate your class namespaces to Java packages, and finally I showed you how to use these packages in code. Now that we have a better idea on how we organize our Java code, we’re going back to classes in the next lesson.
Wrap up
Hey! Thanks for watching the video.
There is a quick quiz for this on DeegeU.com if you’d like to gauge how much you learned.
If you like the videos you are seeing please let me know by liking the video and hitting the subscribe button for the DeegeU channel on YouTube. I’d really appreciate that. If you have concerns or questions please leave them in the comments below or on DeegeU.com. There’s a poll on the front page of DeegeU.com so you can let me know what topic is covered next.
Thanks for watching and see you in the next video!
<!-- DeegeU - Right Side -->
<ins class="adsbygoogle" style="display:inline-block;width:336px;height:280px" data-ad-client="ca-pub-5305511207032009" data-ad-slot="5596823779"></ins>
<script>
(adsbygoogle = window.adsbygoogle || []).push({});
</script></p>
Tools Used
- Java
- NetBeans
Media Credits
All media created and owned by DJ Spiess unless listed below.
- No infringement intended
Get the code
The complete video lesson list for this free online programming course can be found on the course syllabus page.
The source code for “The Java Packages Tutorial Video of Your Dreams” can be found on Github. If you have Git installed on your system, you can clone the repository by issuing the following command:
git clone https://github.com/deege/deegeu-java-intro.git
Go to the Support > Getting the Code page for more help.
If you find any errors in the code, feel free to let me know or issue a pull request in Git.
Comments

DJ Spiess
Your personal instructor
My name is DJ Spiess and I’m a developer with a Masters degree in Computer Science working in Colorado, USA. I primarily work with Java server applications. I started programming as a kid in the 1980s, and I’ve programmed professionally since 1996. My main focus are REST APIs, large-scale data, and mobile development. The last six years I’ve worked on large National Science Foundation projects. You can read more about my development experience on my LinkedIn account.

